Asterisk PBX Support

Connect your open source PBX to our SIP trunks.

IPComms began connecting our SIP trunks to Asterisk® PBXs in 2002. And not to brag, but since then, we've successfully provided over 30,000 SIP/IAX trunks to almost every version of Asterisk on the market.

So, whether you're a forum-surfing, wiki-reading, ISO-burning open source PBX newbie or a full-fledged, Digium® certified, card-carrying member of every Asteriskusers group on the Web... we're sure to be the SIP Trunking service provider you want in your SIP.conf file

Our USA-based support staff is here to help you get your Asterisk PBX connected to our IPComms' SIP trunks. In fact, we'll prove it to you!  Sign up for our Free SIP Trunk Trial and experience our extremely high-quality service and technical support for yourself.  We also have plenty of Asterisk PBX Videos and Asterisk Tutorials available online.

ASTERISK PBX SECURITY TIP #1

ASTERISK PBX SECURITY TIP #1

If you own or operate an Asterisk PBX, trust us, security will be a priority for you... either now or later! If you only do one thing to secure your PBX, take this next piece of advice seriously! What ever you do, no matter how tempting it may be, Never, Never, Never...

... use the default passwords on any PBX. Password security is one of the easiest security measures you can take and by far one of the best ways to stop the top 99% of all hacks as weak password security is easily the most common way hackers enter IP PBX systems.

When installing your IP PBX, the very first step should be to replace both the username and passwords of any account with administrator access. Secondly, when creating user accounts, be sure not to use or allow easy to guess passwords like “1234”, “password”, “companyname1”, extension numbers, etc. Be sure to use strong and unique passwords. This can't be stressed enough.

As tempting and simple as it may be to use your business name with a single digit added to the end of it, don't do it. You would be surprised what these password detectors can figure out with just a little of your business information.

If you need help securing your PBX, contact a member of our technical support team. We'll be happy to help you secure your Asterisk PBX.

Setting up your IAX Trunk inside PBX in a Flash

Setting up your IAX Trunk inside PBX in a Flash

This article will help you setup an IAX2 trunk in your PBX in a Flash system and connect it with IPComms SIP trunks..

PBX in a Flash SIP Trunk Configuration & Security

Start this tutorial after you have completed PBX in a Flash Setup. After Installation, you will need to obtain your IP Address. Once the IP Address has been typed in you will be able to see PBX in a Flash with the Icons: Voicemail & Recordings, Flash Operator Panel, and MeetMe Conference for users, and FreePBX® Administration, Linux Webmin, and Menu Configuration for the Admin user.


Configuration-FreePBX®


FreePBX® is a Registered Trademark of Schmooze Com, Inc.

Before you begin

  1. To begin you will need to enable PBX in a Flash for Admin this is done by clicking on the Users.
  2. Next click the FreePBX Administration this will take you into the GUI of the PBX. The username for a first-time login is maint and the password is what you have entered earlier in the command line of setup.
  3. On the left-hand side, you will see a list of options.
  4. In order to have a softphone registered you will need to setup Trunks, and enter your PEER Details from the email of your registration email. After you have entered the credentials from the email, you can check the registered channels by going to FreePBX System Status then look under Total active channels.
  5. To setup your phone system to make and receive calls, setup Inbound Routes you can create anything for the Description, then use one of your numbers for the DID Number then Set Destination this will be the destination where incoming calls will be routed then select Submit.
  6. Next, we will setup Outbound Routes here you can setup your dialing patterns. This will allow you to make calls to destinations based on rules.
  7. A trunk must be setup in order to make outbound calls. If you have made any changes select Apply Configuration Changes.
  8. If you would like to have all extensions call out as a specific number, that can be set by checking Override Extension this is a useful feature if you want people to call back to one specific number.
    • Any routes that have been created will show up on the right-hand side of the page.
  9. Next, we will setup a SIP Extension, to begin choose type. Next enter information that you would like to have for the desired extension.

This current build of FreePBX has a lot of fail-safe's built into the system, which may give you trouble in the initial setup but will pay off after you have more information in the system. Since we have created an extension, it is time to register the extension with a softphone. Since you have created an extension you can then route calls to that extension.

Queues can be used to help call routing.

If you would like to view more advanced setting to the Tools tab on the top of the control panel without having to go through the command line.

What ports should I forward on my Router to make SIP work?

What ports should I forward on my Router to make SIP work?

SIP uses TCP and UDP protocols to carry its call control information (not the payload) and is usually carried on SIP ports 5060 and 5061. The actual payload is transmitted using the RTP protocol (Real-time Transport Protocol) which is specifically designed to carry payloads that are time-sensitive information such as voice and video.   

RTP has a broad range of ports assigned 16384 - 32767. However different SIP vendors use different ports they may or may not fall within this range.

Here are the ports needed for SIP to work.

• Call control:  Ports 5060 and 5061
RTP audio: Ports 16384 - 32767


Top Three Reasons for SIP One-Way Audio

Top Three Reasons for SIP One-Way Audio

The causes of one-way audio in IP Telephony can be varied, but the root of the problem usually involves IP routing issues. This article takes a look at some of the most common scenarios and solutions that have been experienced by our technicians.


What is one-way call audio?  

Simply put, one-way audio is an issue where a call is placed and either the calling party can't hear the called party or vice versa.  In addition, while not exactly a one-way issue, similar causes can present itself where neither party can hear the other.  One-way audio is a common issue with SIP trunking, and typically pretty easy to fix. So, we've put together a list of the top four reasons for one-way audio with SIP calls.


Why does one-way audio calls happen?

Without getting terribly over technical, here's an overly simplified explanation of how the SIP protocol works.  SIP or session initiation protocol is a set of rules that two VoIP endpoints negotiate under when communicating.  Within this protocol, there are basically two streams of data; call control data and packetized voice (or payload).  Call control procedures regulate things like call setup and tear-down, ringing, routing, and codec selection. As for the actual transportation of the actual voice payload, this information is transported separately from its call control data.  This is an important piece of information to keep in mind when troubleshooting one-way audio. You'll see why shortly.


A little about SIP ports.

While a bit on the technical side, understanding how SIP ports are used will help you to understand why SIP calls can successfully connect and disconnect, but never pass any voice between the two endpoints or only only pass voice successfully in one direction.

Where an IP address is used to identify a specific device, ports are used to access applications within that device (e.g. port 80=http, 23=telnet, etc...). The SIP protocol uses ports.  

SIP uses TCP and UDP protocols to carry its call control information (not the payload) and is usually carried on SIP ports 5060 and 5061. The payload (voice) is transmitted using another 3-letter protocol called RTP or Real-time Transport Protocol and has a broad range of randomly assigned ports within the protocol (typically RTP ports 16384 - 32767). However different SIP vendors use different ports they may or may not fall within this range.


Top 3 reasons for one-way audio in SIP calls.

The causes of one-way audio in IP Telephony can vary, but the root of the problem usually involves IP routing issues or codec negotiation. 


Number 1:  Network Address Translation (NAT)

Network address translation (NAT) is a router function that allows single public Internet accessible IP address to be shared with several devices within the user's private lan (e.g. 192.168.x.x).  The issue with SIP is that the port on which the voice payload is sent is random. The NAT router will typically be able to handle the call signaling traffic but might have no idea what to do with the actual voice packets.   As a result, the audio traffic is not transported correctly and never makes it to the correct SIP endpoint.

Identifying a NAT issue involves checking the SIP control messaging, and looking to see if the private IP address is being used by the SIP endpoint.  Any many cases, the SIP endpoint will send out it's private IP address (192.168.x.x).  As such, the receiving network has no way get back to the sender.

There are several options when it comes to reparing NAT issues:  
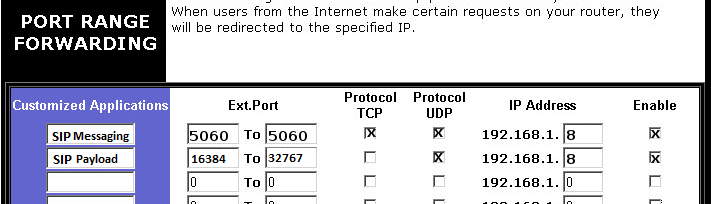
Port forwarding

Port forwarding is a simple solution for those who have a single SIP device on their internal LAN. Multiple SIP devices will not work for this basic example.  While these port forwarding steps will vary by router manufacture, the basic idea is the same.  

Begin by configuring your SIP endpoint with a static IP address.  Port forwarding will not work if the IP address is dynamically assigned, as everytime the device reboots, it could get a different IP address, and you will have to reconfigure forwarding on your router.  Next, log into your router/firewall and forward ports 5060 and 5061 to that fixed IP address.  Finally, route RTP audio ports 16384 - 32767 to that fixed IP address.


Using SIP-ALG

Many enterprise firewalls directly support SIP forwarding to both Proxy/PBX devices as well as to/from VoIP phone endpoints using SIP-ALG.  Check to see if your route supports SIP-ALG.  If not, there are many routes available that do.  


Using STUN

Using a STUN, one keeps open ports on the router/firewall so that SIP and RTP messages coming from the Internet reach the VoIP phone. 
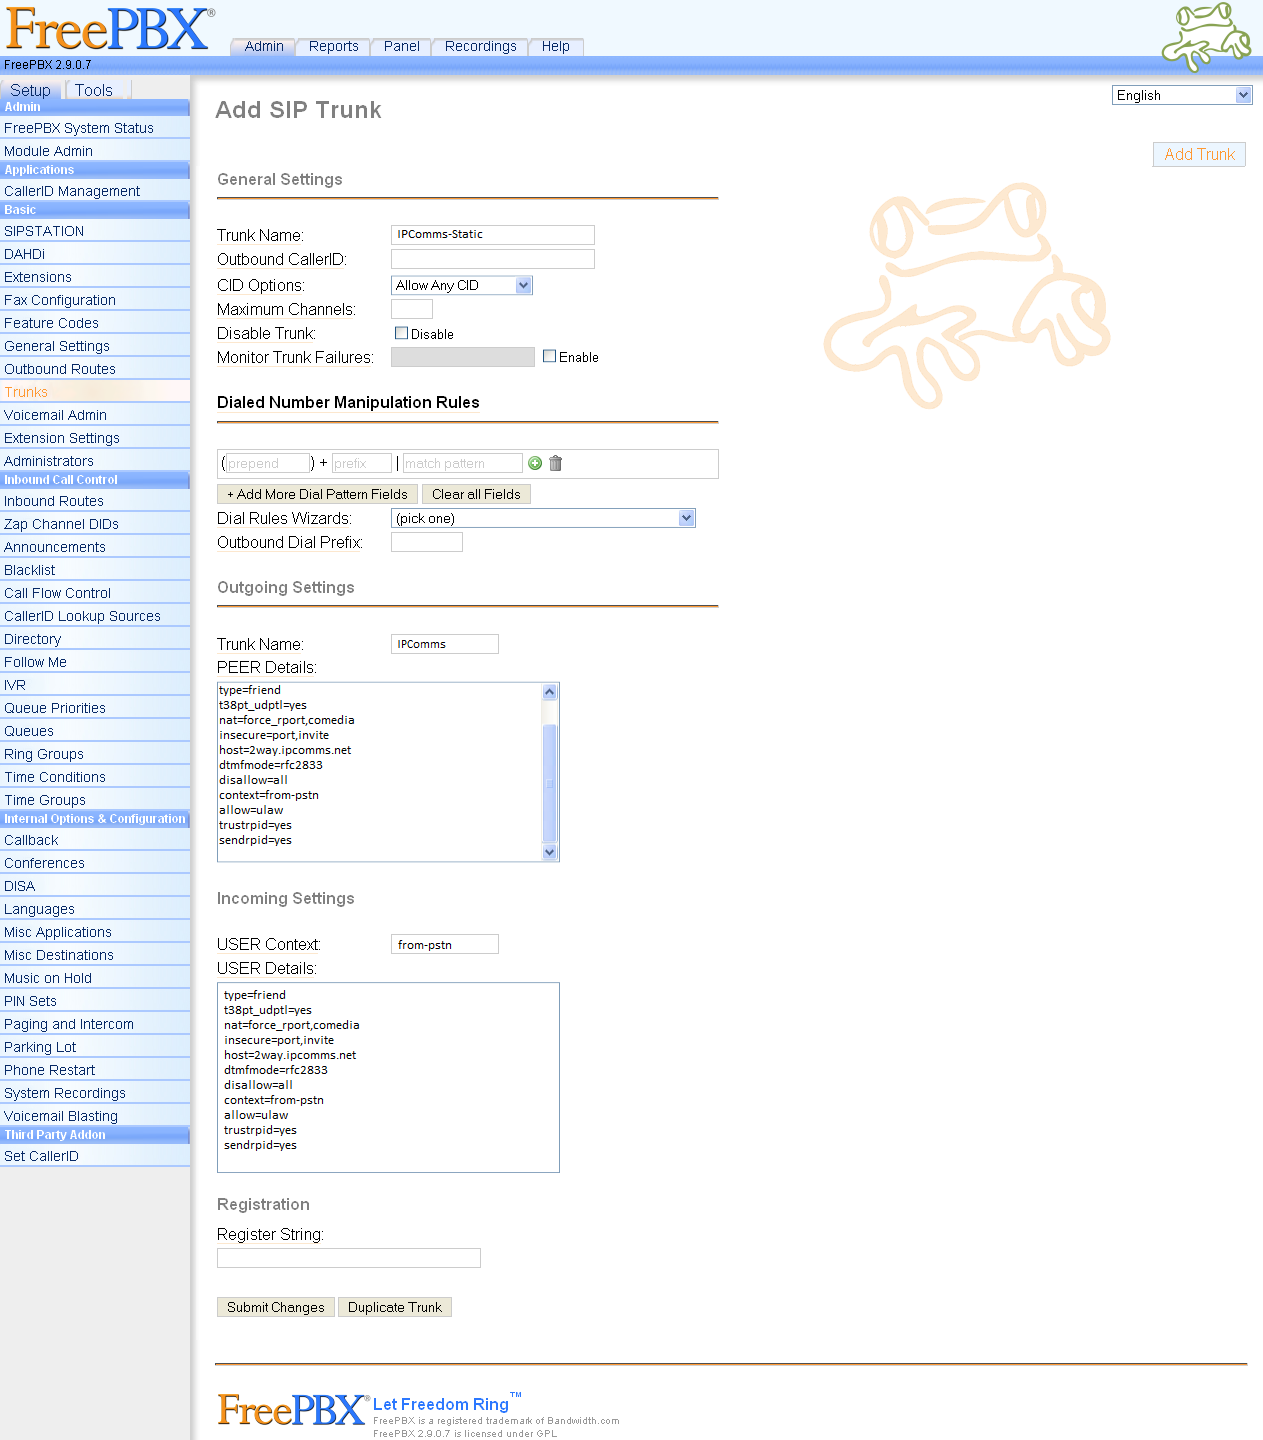


(2) Codecs Mismatch

Without getting too deep into the ins and outs of voice compression, Codecs are simply a way of shrinking the size of the voice payload.  Some codecs provide better quality, while other's provide better compression.  When a SIP call is initiated, phones must first agree on which Codec they'll use to for the call.  If the phones cannot agree on a common codec, it's possible that the result could be one-way audio.  IPComms support codec's G.729 and G.711 codec's.  Make sure these Codec's are enabled and available on your PBX or SIP device.


(3) Network Path Out is Different than Network Path In.

Just because you can reach a location on the internet, doesn't mean that the same location can reach you.  If this problem exists, you could end up with one-way audio.  A simple PING and Traceroute tests can determine if there is a network issue in one direction.  Our IPComms tech support staff can assist with these simple and quick tests.  


PBX in a Flash (Resetting the root password)

Resetting a root Password

How to reset a root password in PIAF and generic RHEL(Red Hat Enterprise Linux) based systems.

Having the ability to reset your PIAF password in-case of a lock-out is very vital when it's necessary to keep an open communication. Resetting a password may take a few minutes.

    • Reboot your server
    • When you see the GRUB loader quickly press a key to disrupt the normal booting process

    • Press the letter "e" to edit
    • Highlight the vmlinuz ...Kernel selection and press the "e" to edit

    • On the end of that line, type,"single" to make the server boot in "single-user mode". Then type "b" this boot the system,and the bash prompt will appear.

    • Once the kernel is booted, you should see a command prompt
    • Type "passwd root" to reset your password
    • Reboot as normal and log in using your new password

You can see, there are options to reset other passwords in PIAF from this menu as well.

*This should work on most RHEL-based systems

***Some devices may have SELINUX enabled or enforced, so it may not work if that is the case.

FreePBX EndPoint Manager

EndPoint Manager

EndPoint Manager is a module within FreePBX®, that can be used to install and provision IP phones as well as manage firmware updates. This is a very useful tool that works with the most of the major brands. As an example we will setup a Cisco phone, to begin select Install on Cisco. Next, you will see available models for that brand, select Enable for your current model. Next, go to the Advanced Settings and set the IP Address of the PBX, and set the directory where phones will update the firmware from.


Through the use of this module, you can optimize provisioning, and manage phones without having to physically configure the phones through each GUI interface, or creating multiple configuration files.


FreePBX® is a Registered Trademark of Schmooze Com, Inc.

Setting up your IAX Trunk inside PBX in a Flash/FreePBX

Setting up your IAX Trunk inside PBX in a Flash

  • Setting up a IAX Trunk is very similar to a SIP Trunk, the biggest difference in registration is the Register String. The IAX trunk contains more information than a SIP Trunk. Trunk information can be copied over just like setting up the SIP Trunks
  • Make sure to set the registration string as; username:password@domain
  • If you would like to see if trunks are registered you can go to the FreePBX System Status and look at IP Trunk Registrations.
  • In the SIP Trunk make sure the contact field behind the registration string. The setup for the registration string will be username:password@domain/sipContact(username)
  • After you have created your IAX Trunk you need to modify the Asterisk IAX Settings inside the Tools.
  • Inside here you will be able to make changes to the Codec's, bandwidth control, and multiple other settings.
  • These items will need to be checked if you have any special type of NAT setup inside the firewall or company.
  • Be sure to open up Port 4569 inside your firewall, as well as ports 10,000-20,000 which are mainly for SIP, but IAX uses some of those ports

Trunk Configuration with PBX in a Flash

Today we will be configuring a Trunk for service with IPComms, to begin we simply copy and paste the information from your registration.

  1. After entering your Trunk Configuration information, click Save Changes.
  2. To check any information you have entered simply go to FreePBX System Status, from here you will be able to see any IP Phones and IP Trunks that are online, as well as some other information about your PBX.
  3. Next we setup an Inbound Route this will benefit you if you have multiple numbers, to avoid confusion and slower system speeds talk to IPComms about getting your numbers mapped to your current trunk. Having too many routes setup, or using out of date software could bog down your system.
  4. Next, we will setup the Outbound Routes, this current route is setup to take calls from any number that starts with a US prefix. Here you will also have the option to setup your route to automatically dial the 1, instead of doing it each call. International Routes may also be setup for different trunks.
  5. If you are having audio issues after setting up your routes you should change your NAT Settings. This is done by going to Asterisk SIP Settings in the Tools tab, and enter your IP Address in the External IP location and the Local Networks so they will automatically mask your IP Address.

Configuring Inbound Routes with PBX in a Flash / FreePBX

Inbound routes are very important if you want to have numbers routed to a specific destination(s). With this current setup, if you are calling 6784601475 (DID Number) and you are calling from 7702180222 (CallerID Number) the call will come in as it is setup below with music on hold, signal ringing, and a 3-second pause before it goes to the destination set below (Marcus Cell). If your provider does not provide inbound Caller ID, the Caller ID (CID) Superfecta may be a work around.


This module determines how incoming calls are routed inside your PBX. Rules may be given priority levels so that incoming calls will be routed based on how they are seen coming into the PBX. Be sure to turn off "Anonymous SIP Calling" so that you will be able to receive calls. By setting up Inbound Routes you can have setup a few rules to route to specific destinations, the fewer a number of routes the faster the processor can run a process the calls being made If rules are not set correctly then calls will not hit the PBX correctly, and cause calls to fail.

To setup an inbound route for your IPComms DIDs, follow these steps:

  1. Log on to your FreePBX Administration interface.
  2. Next, select Incoming Routes, then click Add Incoming Route.
  3. Enter a description for this route.
  4. Enter your IPComms DID in the DID Number field.  You must 1 before the number: for example, 16784601475.
  5. Leave the Caller ID Number field blank and leave the rest of the fields alone.
  6. Next, choose a destination for this number: (e.g. Voicemail, Extension, IVR, etc.)
  7. Submit your changes.  Then click Apply Configuration Changes.
  8. Repeat these steps, for each DID that requires a separate route.

NOTE: If you do not have the proper inbound routes configured, FreePBX will connect the call and play the following message, "The number you have dialed is not in service... "

Double check your configureation if you receive this message.


PBX in a Flash, trixbox and Elastix are open-source user interfaces for the management and configuration of Asterisk PBXs. The Asterisk Administration GUI interface can differ depending on which version was chosen. Using the Asterisk Administration Interface you can configure most of Asterisk's features without editing the actual command line configuration files. You can also setup advanced options like call routing, voicemail, and more via the GUI Interface. Below are some examples of common procedures you might require. You can download the Trixbox, Elastix, and PBX in a Flash software directly from their respective websites.

How to Install Asterisk PBX with Ubuntu/Debian (Linux OS)

Below are the steps to building Asterisk PBX on a Debian/Ubuntu Linux OS

The current build was done on Ubuntu 12.04.3 LTS. This should world on Debian Wheezy and Higher.
This is a vanilla install of Asterisk 13, with no Web Interface or extra features.


Let's start by running these commands:

root@asterisk-13-build-ubu~# sudo apt-get update
root@asterisk-13-build-ubu:~# sudo apt-get install build-essential


Build essentials will install the following Packages:

binutils
cpp
cpp-4.6
dpkg-dev
fakeroot
g++
g++-4.6
gcc gcc-4.6
libalgorithm-diff-perl
libalgorithm-diff-xs-perl
libalgorithm-merge-perl
libc-bin
libc-dev-bin
libc6
libc6-dev
libdpkg-perl
libgomp1
libmpc2
libmpfr4
libquadmath0
libstdc++6-4.6-dev
linux-libc-dev
make manpages-dev


You will then install these below packages:

root@asterisk-13-build-ubu:~#
apt-get install –y git-core subversion libjansson-dev sqlite autoconf automake libtools libxml2-dev libncurses5-dev


From here, you are able to download asterisk 13 and compile it.

root@asterisk-13-build-ubu:~# cd /usr/src/
root@asterisk-13-build-ubu:~# wget http://downloads.asterisk.org/pub/telephony/asterisk/asterisk-13-current.tar.gz
root@asterisk-13-build-ubu:~# tar –xzvf asterisk-13-current.tar.gz
root@asterisk-13-build-ubu:~# cd asterisk-13.0.0/
root@asterisk-13-build-ubu:~#./contrib/scripts/install_prereq install ( this will install more packages, a lot of them)
root@asterisk-13-build-ubu:~# ./bootstrap.sh
root@asterisk-13-build-ubu:~# ./configure
root@asterisk-13-build-ubu:~# make && make install
root@asterisk-13-build-ubu:~# make samples
root@asterisk-13-build-ubu:~# sudo make config
root@asterisk-13-build-ubu:~# asterisk


From here, asterisk should already be running and you can log in with this command:

root@asterisk-13-build-ubu:~# asterisk -r


Connected to Asterisk 13.0.0 currently running on asterisk-13-build-ubu (pid = 7459)
asterisk-13-build-ubu*CLI>


Asterisk is Ready.


Connecting SIP trunks with IP Authentication (Asterisk/FreePBX)

IPComms allows two types of SIP trunking when connecting to our network. Our default registration method and by far the most common, is basic SIP Registration.  This method uses a SIP username and password with a registration string to connect to our SIP network.  The second methog, which is less common, but useful in many scenarios, is SIP IP Authentication.  

This article will cover registering your Asterisk PBX to IPComms using SIP IP Authentication.


NOTE: Be careful when editing information within your configuration files. It is best practice to perform a complete back up before modifying settings within your PBX. Any custom configurations may cause you phone system to behave differently than intended.


We'll begin by creating an outbound SIP trunk.

To place outbound calls in Asterisk systems, you will need to create an outbound trunk entry which will route outbound calls to the IPComm's SIP network and also configure how phone numbers will be delivered by configuring your dial plan settings in your extensions.conf file.  This article will walk you through this process.

This sample configuration shows how to add and configure an outbound SIP trunk using the FreePBX front end interface. Most importantly, we will be adding entries into the Peer Details and User Details sections.


 Step-by-step SIP trunk creation:

  • To begin, navigate to the Trunks section of the main menu.
  • From here, you will provide an arbitrary trunk name (you can make this anything you want).
  • Next, you will name your trunk in the Trunk Name field.  (Again, you can name this anything you want to.)
  • Now, you will paste your peer details into the area given.  This information should have been sent to you by IPComms in your provisioning letter.  It should look similar to the sample screenshot given below.
  • Next, you will paste the same information into your user details into the area given.  
  • There will be no registration string as this example is for IP Authentication.  For SIP registration, see our SIP registration example.
  • Finally click Submit Changes, and you are all set.


FreePBX Screenshot -Add SIP Trunk (click to enlarge)

IPAuth FreePBX Config


The next step is to create an outbound route in FreePBX/Asterisk PBX.

The outbound route is used to determine what numbers will be routed to the new Outbound Trunk you just created.  Your specific outbound routing rules might differ, but below is an example of sending 7, 10 and 11 digit phone numbers out of the SIP trunk you just created.  

In this example, we've created 3 entries

  • 1NXXNXXXXXX ....(11-digit dialing)
  • NXXNXXXXXX ....(10-digit dialing)
  • NXXXXXX .... (7-digit dialing)

Then we'll route these calls to our IPComms-Static trunk in the Trunk Sequence for Matched Routes section of our FreePBX/Asterisk PBX outbound route page.


Outbound Routes


IPComms SIP Trunk Registration (Asterisk/FreePBX)

IPComms SIP Trunk Registration (Asterisk/FreePBX)

The first step in making and receiving phone calls using the IPComms SIP trunking network is registering your SIP device to our network using SIP registration. This article will cover registering your Asterisk PBX to IPComms using SIP IP Authentication.


NOTE: Be careful when editing information within your configuration files. It is best practice to perform a complete back up before modifying settings within your PBX. Any custom configurations may cause you phone system to behave differently than intended.


We'll begin by creating a SIP trunk.

SIP registration is the process in which the endpoint sends a SIP REGISTER request to our SIP trunking (the SIP SERVER) to let the server know where it is.  SIP registration requires a SIP username, SIP password, and the SIP server address.  To place and receive calls in Asterisk PBX, you will need to first add a SIP trunk entry which will be used to connect to IPComm's SIP network.   This article will walk you through this process.

This sample configuration shows how to add and configure an IPComms SIP trunk using the FreePBX front end interface. Most importantly, we will be adding entries into the Peer Details and User Details sections.

Note: Alternatively you can choose to connect to IPComms with IP authentication rather than SIP username/password registration.  To enable IP authentication on your IPComms account, contact technical support and request the change.


 Step-by-step SIP trunk creation:

  • To begin, navigate to the Trunks section of the main menu.
  • From here, you will provide an arbitrary trunk name (you can make this anything you want).
  • Next, you will name your trunk in the Trunk Name field.  (Again, you can name this anything you want to.)
  • Now, you will paste your peer details into the area given.  This information should have been sent to you by IPComms in your provisioning letter.  It should look similar to the sample screenshot given below.
  • Next, you will paste the same information into your user details into the area given.  
  • There will be no registration string as this example is for IP Authentication.  For SIP registration, see our SIP registration example.
  • Finally click Submit Changes, and you are all set.


IPComms SIP Trunk Registration - FreePBX/Asterisk -  (click to enlarge)

SIP TRUNK REGISTRATION IPCOMMS FREEDID


To verify that your PBX is registered with IPComms, Click FreePBX System Status on the main menu, and you will see the number of IP Trunk Registrations under the FreePBX Conections section:


FreePBX System Status


The next step is to create an outbound route in FreePBX/Asterisk PBX.

The outbound route is used to determine what numbers will be routed to the new Outbound Trunk you just created.  Your specific outbound routing rules might differ, but below is an example of sending 7, 10 and 11 digit phone numbers out of the SIP trunk you just created.  

In this example, we've created 3 entries

  • 1NXXNXXXXXX ....(11-digit dialing)
  • NXXNXXXXXX ....(10-digit dialing)
  • NXXXXXX .... (7-digit dialing)

Then we'll route these calls to our IPComms-Static trunk in the Trunk Sequence for Matched Routes section of our FreePBX/Asterisk PBX outbound route page.


Outbound Routes


11 Steps to Secure your PBX

11 Steps to Secure your PBX


Don't be a victim of telecom theft

If you are reading this, you're probably like most of us... after many hours, or even several days of downloading software, setting up servers, configuring trunks, and cracking open firewall ports, you finally achieve success - your PBX is working, and calls are passing.   So, you wipe the sweat from your forehead, push away your ergonomic mesh-backed office chair (with lumbar support), and walk away pleased - not giving a second thought to security.  Until one day, you log into your PBX and see the skull-and-boned call sign of a hacker that has decided to pay you’re perfectly running PBX a visit. 


As a SIP trunking provider, our support team at IPComms sees this very scenario much more than we’d like to.  For those PBX owners who are lucky, they’re only faced with hours of downtime and a complete system rebuild.  However, unlike getting your personal computer hacked, getting hacked into your business PBX, gives the unscrupulous instant access into your virtual wallet via what is known as toll fraud.

Using toll fraud, a well-informed hacker can siphon thousands of dollars in as little as one night while you sleep blissfully.  With heavy volumes of wholesale phone traffic at the ready, a single hacked PBX can transmit thousands of minutes worth of phone calls to destinations with calling rates as high as five bucks a minute or more!  

Scared yet?  Well, you should be, especially, if you have just downloaded, installed and SIP "trunked" your new Asterisk PBX server without implementing even basic Asterisk PBX security.  Trust us, it's not a question of if your PBX will be hacked, it's just a matter of how long it will be before it happens!  So, why not take a few minutes and finish your Asterisk PBX installation by performing some relatively simple PBX security; that could pay off big in the long run? Ever heard the old adage, "An ounce of prevention is worth a pound of cure"?  Well, that author was undoubtedly referring to PBX security! 

PBX security - is not rocket science

Hopefully, you’re here proactively, and not after the damage has been done.  But, if not, at least you have learned your lesson and plan to do things right this time.

While PBX security, like most other security, requires constant attention and is a continuous work-in-progress, there are some basic common-sense steps that you can perform that will safeguard your system from the most common of attacks. 

As mentioned in our “What is Telecom Fraud” blog, most hackers are not looking for a long drawn out hack and would much rather move on to easier targets if you would only put up a little fight.  So we’ve put together a list of “11 steps to secure your Asterisk® PBX”.  While this list speaks directly to Asterisk PBX owners, many of the steps can easily be carried over to most other IP PBX (VoIP) manufacturers.


Here are the 11 Steps to Secure your Asterisk PBX

  1. Physically secure your IP PBX and network hardware.
    Physical security is critical and commonly overlooked. Be sure access to your hardware is limited to only those with appropriate access permissions, actually require access, and most importantly, know what they are doing!  We tech's like to play around with stuff, but that's why we have labs.

  2. Never, Never, Never use the default passwords on any system. (Use Strong Passwords)
    If you are truly concerned about PBX security, you will take this one piece of advice seriously!  Password security is easy and by far the best way to stop the top 99% of all hacks as it is easily the most common way hackers enter IP PBX systems.

    When installing your IP PBX, the very first step should be to replace both the username and passwords of any account with administrator access. Secondly, when creating user accounts, be sure not to use or allow easy to guess passwords like “1234”, “password”, “companyname1” etc.  

    Also, be sure to use a strong and unique password.  This can't be stressed enough.  As tempting and simple as it may be to use your business name with a single digit added to the end of it, don't do it.  You would be surprised what these password detectors can figure out with just a little information. 

  3. Never use the same username and password on your extensions.
    This is another VERY common issue, especially within the Asterisk community.  Using password 101 for extension 101 is asking for big trouble.  DON’T DO IT!

    An example of what NOT to do on your extensions: 
    ; sip.conf  
    [101] 
    username=101 
    secret=101
    host=dynamic 

  4. Place your PBX behind a firewall
    Lets’s face it, working on your PBX from home or allowing co-workers access to the system remotely is necessary and often unavoidable.  However, doing it correctly can be the difference between security success and total and utter failure.  VPNs are a good way to limit access and enable co-worker remote management. Placing your PBX behind a firewall and Restrict remote access to your IP PBX to specific IP Address will greatly discourage even the most determined hacker.  While hardware firewalls typically provide the most security, software firewalls can be just as effective and much cheaper (many are free).   

    Firewalls, of course, are only as good as the rules defined within them.  So be sure to only activate ports that are absolutely essential to run your PBX. Block anonymous WAN requests (P-I-N-G).  Let's face it; if they can find you, they can hack you.

    When possible, place your IP PBX on a LAN with Network Address Translation (NAT).  NAT basically gives your IP PBX a private IP Address and makes it much more difficult to gain access to from the internet.  While it may be easy to simply disable NAT for simplicity (especially when you run into that pesky one-way audio issue, don't do it.  Take the time to set it up correctly, and you'll be glad you did.

  5. Use the “permit=” and “deny=” lines in sip.conf
    Use the “permit=” and “deny=” lines in sip.conf to only allow a small range of IP addresses access to extension/user in your sip.conf file. This is true even if you decide to allow inbound calls from “anywhere” (default), it won't let those users reach any authenticated elements!

  6. Keep inbound and outbound routing separate (asterisk)
    This is probably the biggest cause and source of toll fraud.  By keeping your inbound call routing in a different context than your outbound routing, if an intruder does happen to make it into your system, he can’t get back out again.  

  7. Limit registration by extensions to your local subnet.
    Restrict the IP addresses your extensions can register onto the local subnet.  Asterisk PBXs can use the ACL (permit/deny) in SIP.conf to block IP addresses.  This can fend of brute force registration attempts.


  8. Disable channels and services that are not in use
    Disable channels that you aren’t using like skinny and MGCP.  For Asterisk PBXs, you can “unload” these modules in the /etc/modules.conf file like this:

    noload => chan_mgcp.so
    noload => chan_skinny.so 
    noload => chan_oss.so

  9. Make it harder for sip scanners (Set “alwaysauthreject=yes” )
    Set “alwaysauthreject=yes” in your sip configuration file. What this does is prevent Asterisk from telling a sip scanner which extensions are valid by rejecting authentication requests on existing usernames with the same rejection details as with nonexistent usernames.  If they can't find you they can't hack you!

    Another way to make it hard for SIP scanners is to install a SIP port firewall.  This will block “scanning” of port 5060 and 5061 and can disable the attempting endpoint for a specific time when it detects a violation.


  10. Limit and restrict routing and phone number dial plans
    Restrict calling to high-cost calling destination and don’t allow calling to 0900 + Premium numbers)

  11. Audit your system security regularly
    Once you’ve reached this point, it's not a bad idea to put your Hacker hat on, and have a try at your own system.  Think like a hacker and try to look for weaknesses or holes in your system security.  It is a good idea to review your system security regularly.  Don’t sleep on security… you can guaranty that thieves aren’t.

The above steps mainly focus on PBX calling and traffic security and do not cover topics related to software protection (e.g. protection against Spyware, Trojans or viruses).   These are also very important and should also be taken into consideration when securing & protecting your PBX.

Did you know...

By switching to a cloud-based PBX service, you can make the 11 steps to secure your IP PBX someone else's responsibility.  Learn more about cloud-based PBX services.


Setting this to “yes” will reject bad authentication requests on valid usernames with the same rejection information as with invalid usernames,